Archive | Recipes RSS feed for this section

Just a Small-Town Girl: Oldsmar’s Centennial Cookbook Challenge   

2 May

I always have and will always be a small-town girl. Once upon a time, I dreamed of moving to NYC to work as a fashion-magazine editor, and then I saw Times Square. Amazing and beautiful, yes, but it just wasn’t my cup of tea full-time. Originally from Granger, Indiana, I left that small town for another small town (Bloomington, Indiana) and eventually another small town (Oldsmar, Florida).

There’s just something magical about living in a small town. (Is John Mellencamp’s “Small Town” playing in your head yet?) I love knowing my neighbors, I love that my community feels more like a group of friends than strangers, and I love that we all wave to each other when we pass by.

And I particularly love living in Oldsmar — close enough to Tampa, Clearwater and Orlando so you get all the big-city fun but far enough of way that you retain the small-town charm in your everyday life. I love that I can walk to the library or to the water any afternoon, and I absolutely love the rich history of this area. Ransom E. Olds, the automobile pioneer, purchased nearly 38,000 acres of land in April 1916 to establish Oldsmar, and this year marks the city’s Centennial Celebration!

As part of that celebration, Oldsmar has been hosting themed concert events every fifth Friday of the month —and it was at one such event that I found an absolute gem: the Oldsmar Centennial Cookbook, featuring nearly 120 recipes from local residents just like me. The Friends of the Oldsmar Library put together this collection of treats, and I had to have one. $15 dollar later, I snatched up my copy and tucked it under my arm for safe-keeping until I could get home.

IMG_5456

On Sunday afternoon, I read the cookbook cover to cover, soaking in not only the recipes but a lot of wonderful history on Oldsmar and its residents. Each recipes has a notes area, filled with the lovely stories about the background of each dish, like the one Grace Kinane shared with the Stuffed Olives entry: “Longtime teacher at Oldsmar Elementary, Helen Scott, shared this after we swooned over them!” Or Bette Rae Maltinos’ submission for Brown Bread, “I have made this since my sons were very small and they could not wait to cut it and eat. I still make this for them even though they are now men.”

The cookbook is also filled with old photos documenting Oldsmar’s history like the town’s very first library and Mr. Olds and President Roosevelt in our streets among others. Who knew that Oldsmar hosted beach parties in the 1920s? Looks like quite a fun time from the photo! I wondered if they served any of these recipes there.

IMG_5472.JPG

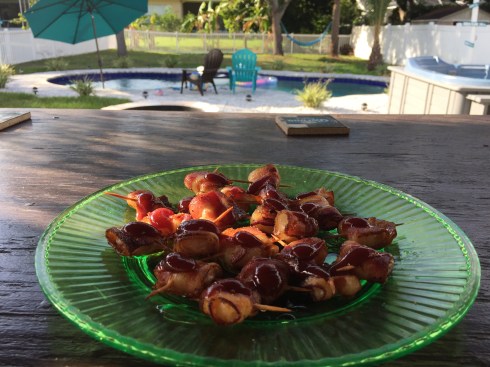
The cookbook inspired me to start a challenge. I’m going to cook my way through each and every entry, starting with the very first one: Joan Wallace’s Bacon-Shrimp Bites. And so I did! Jumbo shrimp wrapped in bacon with a drizzle of barbecue sauce and honey make Sunday just that much sweeter. And with that first bite, I thought, “Yes, Joan. You were right. I should’ve planned for leftovers, because this was delicious!” Thank goodness for those notes.

IMG_5477.JPG

And as I continued read through the pages, I stopped thinking of this as a cookbook all together. It was so much more than a cookbook in my eyes. It was a book, filled with amazing stories. And it reminded me what recipes actually do — they let you gather as a family and make memories over some delicious meals. And within those note sections and among the old photos, there lied our real truth … we are neighbors who share, we are families that love, and we are a community with a treasured past. And that’s why I love being a small-town girl right here in Oldsmar. And that’s life in a nutshell.

Joan Wallace’s Bacon-Shrimp Bites

Jumbo Shrimp: As many as needed

Bacon Slices: Half the amount as shrimp

I cup barbecure sauce

1 drizzle of honey per shrimp

Toothpicks

Cut bacon in half and wrap around the shrimp. Secure with a toothpick. Place on a cookie sheet lined with foil. Broil 6 inches from heat for 5 minutes on each side or until bacon is crisp (we actually grilled these instead on foil). Drizzle with barbecue sauce and honey, and serve.

Note from Joan: I have been serving this for years. It is very quick to make and is low calorie (30 calories per shrimp). I love to have leftovers of this. Keep them in the fridge until the next day and have a few as a tasty lunch.

To purchase your own copy of the cookbook, visit the Oldsmar Public Library at 400 St. Petersburg Drive East in Oldsmar. You can also read more about it here.

MommaNut


Campfire-Inspired Dessert: S’mores Bars

25 Jun

If you haven’t been watching the news, you’re blissfully unaware of the tropical storm that has taken up residency right above my home. With flooded streets and down trees, it is easy to get a bit antsy once the DVR is void of any new shows. So, I fired up the oven and got to work.

This s’mores bar recipe is really easy and super delicious. And most of the items are probably already in your pantry!


Ingredients

1 pouch (1lb. 1.5oz.) Betty Crocker sugar cookie mix

1 cup graham cracker crumbs

1 cup butter, melted

3 cups milk-chocolate chips

4 ½ cups miniature marshmallows

Directions

Heat oven to 375°F. In large bowl, stir together cookie mix and crumbs. Stir in melted butter until soft dough forms. Press into ungreased 13×9-inch pan.

Bake 18 to 20 minutes or until set. Immediately sprinkle chocolate chips over crust. Let stand 3 to 5 minutes or until chocolate begins to melt. Spread chocolate evenly over crust.

Set oven control to broil. Sprinkle marshmallows over melted chocolate. Broil with top 5 to 6 inches from heat 20 to 30 seconds or until marshmallows are toasted. (Watch closely; marshmallows will brown quickly.) Cool 10 minutes. For bars, cut into 6 rows by 4 rows. Serve warm. Store any remaining bars tightly covered.

These are so filling that it doesn’t take much to satisfy your sweet tooth. Wishing you knew the recipe for a similar cupcake recipe? Here you go!

And that’s life in a nutshell. Don’t the let rain get you down! See it as a GREAT excuse to pull out your recipe book and create something amazing!

MommaNut

Easy Dessert: Scotcharoo Family Recipe

5 Jun

When I started college, I was pretty homesick. I had never really been far away from home, and Indiana University was nearly four hours away from my familiar stopping grounds. My birthday is in September, just a few short weeks after my freshman year had started, and I was in desperate need of something from home. And my sister being the most wonderful sister in the world, she must have known that, because a homemade recipe book made its way to my new address.

Inside, my sister had documented all of our family recipes inside. With a handwritten inscription, my sister brought me to tears with her words. And I have held on to that recipe book with dear life every since. It has accompanied me to my first apartment after college, to my apartment with my cousin Ashley, to my first place with PoppaNut, and now to our beautiful home. I’ve added my favorite recipes over the years, and I consult is each and every time I’m in the mood to make something new.

My favorite entries are the ones in my grandmother’s own handwriting. Her famous Texas sheet cake, which my cousins hid each Thanksgiving in Indiana in order to save the most for themselves, is documented inside, along with her peanut-butter balls, her scotcharoos and more. The only one missing is her famous strawberry jam, which I hope to learn to make someday as well.

So, with my recipe book in hand, I flipped through the familiar, recipe-stained pages for just the right thing to make. Scotcharoos it was! Now, if you haven’t heard of scotcharoos, it is basically Rice Krispy Treats with chocolate and butterscotch chips melted over the top. However, I made a few adjustments of my own.

Ingredients

3 Tbsp. butter

4 cups of mini marshmallows

Six cups of Rice Krispy cereal

Bag of chocolate chips

Bag of butterscotch chips

Directions

Melt butter in a medium saucepan on low heat. Then, add in marshmallows, and mix until well-blended. Add in cereal, and mix well.

Pour into a rectangle pan, and place wax paper over the top. Then, press down and carefully remove wax paper.

In a microwave-safe bowl, add in chips (I actually used chocolate chips and peanut-butter chips). Place in microwave on high on 30-minute intervals, stirring each time, until all chips and melted and blended together. Pour over the top and place in fridge to set. Serve with a tall glass of milk!

I sure hope you enjoy them. My little Cashew literally stretched out and watched me make them. I think he was hoping I might drop some so he could sample it too!

And that’s life in a nutshell … making scotcharoos not only satisfies my sweet tooth but it warms my heart thanks to the family tie.

MommaNut

Mission Wives Relax: Cooking Dinner for Your Spouse

20 Jan

This post is dedicated to my amazing sister-in-law, Stacy. She is a woman who really does it all. She helps her dad with work, she works herself, she takes care of her husband and her three amazing children (Hi, Karissa, Kayla and Christopher) and still finds time to comment on almost every single one of my blog posts! And not only that, she keeps up with the five Facebook pages that PoppaNut and I have … and she comments on those too.

Plus, she texts us through the week and tries to schedule SKYPE calls with us too. She is just always there when we need her, and I know she generally cares about what we having going on with our lives … and I’m forever grateful for that.

Stacy and Chris

So, when Stacy emailed me an idea for my blog, I was all over it. It’s called “Mission Wives Relax” because wives certainly need a break from time to time. I mean, look at all the things I listed that Stacy does … this woman needs a tall glass of wine STAT!

Stacy and I are both lucky enough to have amazing hubbies that love to cook and will cook for us all the time. My dinner pick is always homemade sauce, and PoppaNut is always happy to make up a batch from scratch. It’s just a wonderful thing that PoppaNut does that reminds me how much he loves me. And Stacy is married to Chris, a chef who makes the most amazing food for his family and friends.

PoppaNut and I were lucky enough to try Chris’ homemade watermelon salsa when we visited Stacy and Chris last summer. Boy, was that yummy! And Stacy recently shared with me photos from a dinner Chris made for her, and I want to share them with you.

Chris made roasted pork with a raspberry sauce, sautéed corn with onions, broccoli with olive oil in garlic, and cous cous with sunflower seed and red peppers. If your mouth is not watering, you must have just ate lunch! I’ve requested a recipe to share with you guys, so look for that in the comments! I’ll share it as soon as I have it.

The point of this post is not to make you hungry … even though my tummy is talking to me at this very minute. It is to remind the men out there to pick up a spatula and get to work in the kitchen every now and then. My hubby certainly pulls his weight in the kitchen and he knows how much I appreciate that (and how much my tastebuds appreciate it too).

With Valentine’s Day coming up, this might be a good idea for you men to try. Cook up a specialty meal for your sweetie. Then, take pictures and send them to me so I can share them as well!

And that’s life in a nutshell … making dinner for the one you love works up quite an appetite for dessert!

MommaNut

Dropping the Bomb: Jalapeno-Popper Dip

10 Jan

I’m crazy about jalapeno poppers! Those hot peppers dance on my tastebuds like no other item in the grocery store. And when I ran across this recipe on Pinterest for Jalapeno-Popper Dip, I couldn’t resist giving it a try.

It was really easy to make, and most of the ingredients I had on hand in my pantry. I must warn you though … you’ll want to have a tall glass of milk on standby for when your mouth is on fire! You can reduce the heat by not adding the actually jalapeno peppers, but that just seems wrong to me. I mean, you might as well call it just popper dip if you are going to do that. But, it’s your tummy so do as you please!

Ingredients
1 (8 ounce) package cream cheese (room temperature)
1/2 cup mayonnaise
1/2 cup cheddar cheese (grated)
1/2 cup parmigiano reggiano
1 (4 ounce) can sliced jalapenos (pickled)
2 jalapeno peppers (chopped, optional)
1/4 cup panko bread crumbs
1/4 cup parmigiano reggiano

Directions
1. Mix the cream cheese, mayonnaise, cheddar cheese, parmigiano reggiano and jalapenos in a bowl and pour into a baking dish.
2. Mix the panko bread crumbs and parmigiano reggiano and sprinkle over the dip.


3. Bake in a 375-degree oven until bubbling on the sides and golden brown on top, about 10-20 minutes.

This hot dish is great for group gatherings or special events like Super Bowl. I would call it “Man Dip” and the men in the room will eat it right up!

And that’s life in a nutshell … spice up your Super Bowl party with jalapeno-popper dip. Note to self, have mints on the table, too!

MommaNut

Ring In the New Year: New Year’s Eve Recipes

27 Dec

Have any of you heard of Pinterest? My sister introduced me to www.pinterest.com recently, and I completely fell in love with it. It took a few tries to get used to (a dear coworker helped me figure this site out when I was ready to throw the towel in), but now I’m hooked. Basically, this site collects content from a ton of different places. I find DIY craft ideas, recipes and more.

So, before the holidays, I printed out several recipes from Pinterest and I decided to make them. You’ll find two here. These two are also perfect for any New Year’s Eve celebrations you might have in store. Make them for yourselves, and let me know what you think too!

Pretzel & Chocolate Treats

Ingredients

One bag of pretzels (I got the square kinds), one bag of M&Ms, one bag of Hershey Kisses

Directions

Preheat oven to 225 degrees. Spread pretzels on a cookie sheet, and make sure they are laying flat.

Then, unwrap a million Hershey Kisses, and place them on top of each pretzel.

Now, put the cookie sheet in the oven for just about three minutes. You just want the kiss to get soft. Then, press one M&M into each kiss. I got the red and green variety, but for New Year’s, try the multi-colored kind or order some special ones from the M&M’s website!

Allow to cool completely. I popped mine in the fridge for a few minutes to help the chocolate get firm. Then, eat and enjoy!

Oven-Baked Ham & Cheese Sliders

Ingredients for Sliders

6 good white dinner rolls, 1/2 pound of good honey ham, small slices Swiss cheese, 1/3 cup mayonnaise, 1/3 cup miracle whip

Ingredients for Poppy Seed Sauce

1 Tablespoon poppy seeds, 1 1/2 Tablespoons spicy yellow mustard, 1/2 cup butter, melted, 1 Tablespoon minced onion, 1/2 teaspoon Worcestershire sauce

In a small bowl, mix together mayonnaise and miracle whip. Spread onto both sides of the center of each roll. Place a few slices of ham and a slice of Swiss inside of each roll. Close rolls and place them into a large baking dish or heavy cookie sheet. Place very close together.

In a medium bowl, whisk together all of the poppy seed sauce ingredients. Pour evenly over all of the sandwiches. You do not have to use all of the sauce! Just use enough to cover the tops. Let sit 10 minutes or until butter sets slightly. Cover with foil and bake at 350 degrees for 12-15 minutes or until cheese is melted. Uncover and cook for 2 additional minutes or until tops are slightly brown and crispy. Serve warm.

And that’s life in a nutshell … finding a new site to get new recipes has been quite delicious in the end. I hope you make these for your New Year’s celebration!

MommaNut


Inside Mrs. Claus’ Kitchen: A Holiday Recipe Swap

16 Dec

Today, I received a special delivery to my inbox from my gal pal Melissa. Melissa and I went to Indiana University together, and we have stayed close friends ever since (See post). Melissa and her boyfriend Matt have always been amazing cooks … Matt literally made a salmon spread after a night of drinking!

Melissa and I on Sanibel Island, the last time we saw each other.

So, it didn’t surprise me at all when I saw Melissa and her sister Kimberly starting a holiday recipe swap. This is what the email said:

Happy Holidays!

We are participating in a collective, constructive, and TASTY experiment. As such, you have been invited to be part of a recipe exchange concept. We hope you will participate. We have picked those we think would make this fun. Please send a recipe to the person whose name is in position 1 (even if you don’t know him/her) and it should be something quick, easy and without rare ingredients. Actually, the best one is the one you know in your head and can type right now.

Don’t agonize over it, it is one you make when you are short of time.

After you’ve sent the recipe to the person in position 1 below and only to that person, copy this letter into a new email, move my name to position 1 and put your name in position 2. Only my and your name should show when you send your email. Send to 20 friends BCC (blind copy). If you cannot do this within 5 days, let us know so it will be fair to those participating. You should receive 36 recipes. It’s fun to see where they come from! Seldom does anyone drop out because we all need new ideas. The turnaround is fast as there are only 2 names on the list and you only have to do it once.

1 – Kimberly  

2 – Melissa

Upon receiving this, I immedately sent Kimberly my apple-pie recipe. And then I sent the email to 20 of my friends, family and coworkers. But then I got to thinking. Wouldn’t it be awesome if everyone posted their favorite recipe on my blog and then we could all share in the fun!

This apple pie is amazing! Use a cookie cutter for the crust to keep it seasonal!

So, that is my challenge for you. Find a great recipe and share it as a comment below. Then, I’ll start making them and blogging about each one!

And that’s life in a nutshell … I can’t wait to get my hands on your secret family recipes. Those always taste the best!

MommaNut

Thanksgiving Baking: Homemade Apple Pie

27 Nov

Ever since I got an electric mixer for my birthday a few years back, I have loved baking. I make peanut-butter pie quite a bit, and I recently made cupcakes for Halloween. So, when it came to Thanksgiving baking, I knew the desserts would be in my court.

So, I commissioned my aunt Debbie to set me up for a baking challenge: homemade apple pie. Debbie’s apple pie is literally famous in our family. Normally, she has to make about five at a time to keep up with the demands. With my nephew Josh by my side, we took on the famous recipe, adding a few special touches of our own along the way.

I texted Debbie several times along the way with needed direction like “Is this really the right amount of cinnamon” and “How does the crust look.” All and all, I think the end product spoke for itself: four men in complete silence eating homemade apple pie with French vanilla ice cream on top during Thanksgiving dinner.

I’m including the recipe below, along with the recipe for peanut-butter pie! Enjoy baking up these favorite for your family. I know it really made Thanksgiving dinner for me … along with the delicious spread my father-in-law and nephew made. The turkey, mashed potatoes, stuffing and green-bean casserole has been haunting my dreams ever since.

Debbie’s Apple Pie

Peel and core 7­–8 Gala apples; then slice them into thin slices and place into a bowl

Add about 1 cup sugar 

Add about 1/4 cup cinnamon

Add about 2 tablespoons flour 

Stir until all apples are coated

Put apples in to a deep-dish pie crust. Just buy the frozen kind. Pet Ritz is the best. Place 3 or 4 chucks of butter randomly on top of the apples. Please another regular pie crust upside down on the top. Crimp the edges to seal the pie crusts together. Cut decorative slits in the top crust to vent. We used a cookie cutter to make leaf cuts on the top. Brush the top crust lightly with melted butter and sprinkle with a little sugar.

Bake at 350 degrees for about 45 minutes. Leave it longer if you like it a little crispy. To ensure the apples are done, stick a fork in it and make sure they are soft.  If not leave it for another 15 to 20 minutes.  

 MommaNut’s Peanut-Butter Pie

2 cups heavy whipping cream

1/4 cup sugar

8 ounces cream cheese

1 cup crunchy peanut butter

1 cup 4x powdered sugar

1 graham-cracker crust

Whip cream with sugar until fluffy. Mix all other ingredients in a big electric mixer until smooth. Mix in whipped cream. Pour mix into the crust, and chill for several hours. Garnish with chocolate bits.

And that’s life in a nutshell … my favorite part of baking isn’t the final creation; it’s spending time with my family while we enjoy each and every bite of life.

MommaNut

Easy Dinner: Homemade Sloppy Joe’s

9 Nov

Homemade sloppy joe’s is one of my go-to recipes. It is so easy to make, and everyone seems to love it! I haven’t found one person who didn’t rave over this. The recipe came to me from my cousin Ashley. When she lived in Indiana with our cousin Josh, they developed … and perfected … this delicious dish.

So, when she moved to Florida and we got a place together, that is one of the first things she taught me. And I have been making it ever since. In fact, this is the first dish I cooked for PoppaNut after we said “I do.” And when I visited my sister-in-law and her family in Connecticut, I couldn’t resist sharing it again.

Ingredients: garlic, hamburger meat, hamburger buns, Sweet Baby Ray’s BBQ Sauce (Original and Hickory & Brown Sugar varieties), green peppers and onions.

Directions: Place a spoonful of minced garlic into a large, deep pan and let it cook for a minute on high heat. Then, brown meat and drain. Add in peppers, onions and both sauces (add as much or as little as you want depending on how sloppy you like your sloppy joe’s). Place on warm to let the flavor cook together. I usually toast the buns in our toaster oven, then add the sloppy-joe mix and finish it off with some cheese.

You can serve these open-faced or traditional. Make sure you have lots of napkins on hand because these are quite messy. I usually have to eat mine with a fork!

And I wish I had a wonderful “done” photo to share. However, the delicious scent made all of us gobble them up before I could take one.

And that’s life in a nutshell … making family recipes for dinner is a great way to show your family you love them.

MommaNut

Yum Yum: Making Cupcake Pops

7 Nov

So, you all know I’m knocking on death’s door with this bronchitis. I am been so under the weather that PoppaNut and I haven’t been able to do much of anything (unless you count my snoring and drooling as a hobby). So, I reached out to my very talented sister for today’s post.

My sister is really incredible. She has five kids, ages 16 to 2, and she managed to care for all of them while putting herself through school. I know I often say how busy I am, but I literally have no idea how she makes it through her week. I would need one massive app to keep me together!

And on top of that, she is a kindergarten teacher! So, on top of spending her time with her kids, she helps teach kids all day long as well. And teachers have limited resources! You wouldn’t believe all the things she has to buy herself just because she is so passionate about helping her students.

And all of that … among a lot of other things … is why I’m so proud to have her as my sister. She always tells me the truth, she steers me in the right direction when I need guidance and she is a true friend to me!

Well, somehow my dear sister found four spare hours in a day … I have no idea how this is possible. I have a hubby and two dogs and I can’t find time to go to the bathroom alone! But this superwoman somehow made it possible so she could make Cake Pops with her daughter for several classrooms at school. Yeah, I need to give back more to charity because I’m feeling very guilty at the moment.

I wanted to share the recipe and a fun photo! WARNING: My sister says this takes a LOT of time and patience. If you don’t have that, I would suggest forwarding the recipe to someone who does and then sampling what they make. The recipe originally came from Family Circle, and my sister told me to tell everyone about this website as well: www.bakerella.com. Enjoy!

Basic Cake Pops

1 box cake mix
13x9x2″ cake pan
Large mixing bowl
1 container (16 oz ) prepared frosting
Large metal spoon
Wax paper
2 baking sheets
Plastic wrap
Black edible ink pen

1. Bake cake as directed on box, using the cake pan. It is best to bake the cake the day prior to decorating the cake pops.

2. Once cake is cooled, get organized with all supplies, and set aside an hour to crumble, roll, and dip 4 dozen cake pops. (It took me approximately 3-4 hours all together.)

3. Crumble cooled cake into a large mixing bowl. Cut it into four equal parts. Remove one section and break it in half, rubbing the two pieces together over a large bowl making sure to crumble it completely. You can also use a fork to break it up. Repeat with each section of the cake. There should be no large pieces of the cake left.

4. Add 3/4 (I added a little less than that) of the container of frosting to the crumbled cake. Use the back of a metal spoon to blend. You do not need the remaining frosting.

5. The mixture should be moist enough to roll into 1 1/2″balls and still hold a round shape. After rolling by hand, place them on a wax paper-covered baking sheet.

6. Cover with plastic wrap and chill for several hours in the fridge, or place in the freezer for 15 minutes. You want them to get firm, but not frozen.

Pirate Cake Pops

48 uncoated Basic Cake Pops
48oz (3 pounds) white candy coating
2 deep, microwave safe plastic bowls
48 paper lollipop sticks
Styrofoam block
24 ounces red candy coating
About 15 white confetti sprinkles per cake pop
Toothpicks
48 red M&M’s minis
48 red jumbo heart sprinkles
Black edible-ink pen

1. Have the cake balls chilled.

2. Melt the white candy coating in a microwave safe plastic bowl, following the instructions on the package. The coating should be about 3″ deep for easier dipping. (Work with about 16oz of candy at a time.)

3. When you are ready to dip, remove a few cake balls at a time from the fridge, keeping the rest chilled.

4. One at a time, dip about 1/2″ of the tip of a lollipop stick into the melted candy coating, and insert the stick straight into a cake ball, pushing it no more than halfway through. Dip the cake pop into the melting coating, and tap off any excess coating: Hold the pop over the bowl in one hand, and tap your wrist gently with your other hand. (If you use the hand holding the cake pop to shake off the excess coating, the force of the movement will be too strong and could cause the cake pop to fall off the lollipop stick. Tapping the wrist holding the cake pop absorbs some of the impact.) The excess coating will fall off, but you will need to rotate the lollipop stick so the coating doesn’t build up on one side, making it too heavy on that side. If too much coating starts to build up at the base of the stick, simply use your finger to wipe it off, spinning the lollipop stick at the same time. This can happen if the coating is too thin or too hot. It’s not as hard as it sounds; it just takes a little practice.

5. Let dry completely in a Styrofoam block. (Pre-puncture holes in the block prior to getting started).

6. For the bandannas, melt the red candy coating in the second microwave safe bowl and dip the top half of each cake pop into it, holding the pop at a diagonal angle. Before the red candy coating sets, place miniature white confetti sprinkles randomly on the top. You can also attach after the coating dries by using a toothpick to dot on coating and then attaching the sprinkles.

7. Let dry completely in the Styrofoam block.

8. To finish the bandannas, use a toothpick to dab a little red candy coating to one side of the pop, and attach a red M&Ms mini. Hold it in place until the candy coating sets like glue. Use the same technique to attach a jumbo heart sprinkle, with the pointed end toward the cake pop, for the final touch, and let dry.

9. For the faces, use a black edible ink pen to draw on eyes, patches, and mouths. Let dry completely. (I tried to use the edible ink pen, but it was a fine tip and would not write on the candy coating, so I had to use melted chocolate chips and draw each face on using a toothpick.)

And that’s life in a nutshell … or perhaps a cake pop this time.

MommaNut